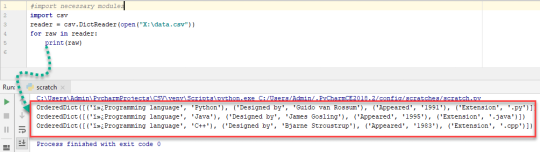
#excel tutorial text to columns
Explore tagged Tumblr posts
Visit Tumblr Blog
Explore Tumblr blogs with no restrictions, modern design and the best experience.
Last Seen Tumblr Blogs


Fun Fact
Kazakhstan’s Minister of Communications and Informatics has blocked the Tumblr site because it contained 60 sites of terrorism, extremism, and pornography in 2015.
Text
data cleansing
🧹 Common Data Cleansing Tasks ChatGPT Can Handle
ChatGPT is capable of assisting with various data cleaning operations, including:
Standardizing text formats: Converting text to a consistent case (e.g., all uppercase or lowercase).
Correcting inconsistent entries: Aligning variations of similar entries (e.g., "NY" vs. "New York").
Handling missing values: Identifying and filling in missing data points.
Removing duplicates: Detecting and eliminating duplicate records.
Parsing and formatting dates: Ensuring date fields follow a consistent format.
Flattening nested data structures: Transforming complex data into a flat, tabular format.
Validating data entries: Checking for and correcting invalid data entries.robertorocha.infoPackt
For instance, in a dataset containing employee information, ChatGPT can standardize inconsistent name formats and unify various date formats for joining dates. KDnuggets+2Packt+2robertorocha.info+2
🛠️ How to Use ChatGPT for Data Cleaning
To utilize ChatGPT for data cleaning, follow these steps:tirabassi.com
Prepare Your Dataset: Ensure your data is in a structured format, such as CSV or Excel.
Upload the File: In ChatGPT, click the "+" icon to upload your dataset.
Describe the Cleaning Task: Clearly specify what cleaning operations you want to perform. For example:https://data-finder.co.uk/service/data-cleansing/
"Please standardize the 'Employee Name' column to title case and convert the 'Joining Date' column to the YYYY-MM-DD format."
Review and Execute: ChatGPT will generate and execute Python code to perform the specified cleaning tasks, providing you with the cleaned dataset.Medium+2OpenAI+2Packt+2
This approach is particularly beneficial for users without extensive coding experience, as ChatGPT handles the scripting and execution of data cleaning operations. Medium+3OpenAI+3StatsAmerica+3
⚠️ Considerations and Limitations
While ChatGPT offers significant advantages in data cleaning, be mindful of the following:
Accuracy: ChatGPT performs best with well-defined tasks. Ambiguous instructions may lead to suboptimal results.
Data Sensitivity: Avoid uploading confidential or sensitive data, especially when using non-enterprise versions of ChatGPT.
Scalability: For very large datasets (e.g., millions of rows), consider breaking the data into smaller chunks or using specialized data processing tools. OpenAI Community
📚 Additional Resources
For a visual guide on using ChatGPT for data cleaning, you might find this tutorial helpful:
Feel free to share a sample of your dataset or describe your specific data cleaning
1 note
·
View note
Text
Excel Power Query vs. Power Pivot: Which Tool Should You Use?

If you’ve ever worked with large datasets in Excel, you’ve probably reached a point where basic formulas just aren’t enough. That’s where two of Excel’s most powerful features come in: Power Query and Power Pivot. Both tools are essential for data analysis, but they serve different purposes.
So how do you decide which one to use? In this guide, we’ll walk through the differences between them and help you figure out the right tool for your needs.
What Is Power Query in Excel?
Power Query in Excel is a tool designed to clean, transform, and prepare data for analysis. It allows you to import data from different sources, fix formatting issues, and shape the data exactly how you want it, all without changing the original files.
Key Benefits of Power Query:
Connects to many sources: Excel files, text files, databases, online sources, and more.
Cleans data efficiently: You can remove duplicates, split columns, filter rows, and convert data types.
No need for coding: Its visual interface makes data prep easy, even for non-programmers.
Keeps a clear log: Every step is recorded, so changes are easy to trace or undo.
If you regularly work with messy data from different departments or systems, Power Query is the tool that helps you get it all in one place and ready to go.
What Is a Power Pivot? A Practical Tutorial
Power Pivot is an advanced data modeling feature in Excel. Instead of just working with a single flat table, it lets you work with multiple related tables. You can create relationships, use calculated fields, and build powerful pivot tables from huge datasets.
What Power Pivot Does Best:
Handles big data: It can work with millions of rows without slowing down.
Creates relationships: You can link multiple tables without merging them.
Supports DAX formulas: These allow you to create advanced calculations that go beyond standard Excel functions.
Improves reporting: Helps build dynamic dashboards and pivot tables based on complex models.
If you’re building reports that need to pull information from several tables, Power Pivot will save you hours of work and improve the quality of your analysis.
Power Query vs Power Pivot: A Side-by-Side Comparison
Let’s break it down clearly:FeaturePower Query in ExcelPower Pivot TutorialMain Use Preparing and transforming data Modeling data and running advanced calculationsStrength Connecting and cleaning data from sources Creating relationships and custom measuresInterface Step-by-step visual editor Data model view with DAX supportIdeal For Standardizing messy input data Analyzing large structured datasets
So, Power Query is for cleaning and prepping. Power Pivot is for modeling and analyzing. Simple as that.
Using Both Tools Together
You don’t have to choose between them. In fact, combining both tools gives you the best results.
A Typical Workflow:
Start with Power QueryLoad the data, clean it, and apply all your transformations.
Move to Power PivotCreate relationships between the tables, define measures, and build your reports.
This combination is what makes Excel a real powerhouse for data analysis. It’s a workflow many professionals use daily.
When to Use Power Query
Here are situations where Power Query is the better choice:
You need to import data from multiple sources.
You’re dealing with messy or inconsistent data.
You want to automate data cleanup tasks.
You need a repeatable process that updates with fresh data.
If you find yourself repeating the same steps every time you get new data, Power Query can handle all of that with just one click.
When Power Pivot Is the Right Tool
Use Power Pivot when:
Your data is too large for regular Excel to handle efficiently.
You’re working with multiple related tables.
You want to build custom KPIs and metrics.
You need to create a dynamic dashboard with slicers and filters.
Power Pivot is perfect for business analysts who need to dive deep into data and build powerful reports without leaving Excel.
Final Thoughts
Understanding how Power Query in Excel and Power Pivot work, And how they work together can completely change the way you use Excel. They are part of a bigger trend of self-service BI tools, giving more power to users without relying on IT or external software.
Use Power Query to clean and organize your data.
Use Power Pivot to model and analyze it.
Use both tools to build a streamlined, automated workflow that saves time and improves accuracy.
If you’re serious about improving your Excel skills, learning both tools is a smart investment.
0 notes
Text
Boost Your Power BI Skills with This DAX Guide | Memetic Solutions
DAX (Data Analysis Expressions) is a powerful formula language used in Power BI to create custom calculations and data models. Understanding DAX is crucial for anyone looking to harness the full potential of Power BI for data analysis. Here's an easy-to-follow guide to help you dive into DAX functions, their applications, and how they can transform your data insights.
What Are DAX Functions?
DAX is a formula language specifically designed for Power BI, Excel, and Analysis Services. It enables you to create calculated columns, measures, and tables to derive deeper insights from your data.
Key Types of DAX Functions: -
Aggregation Functions: Perform calculations like SUM, AVERAGE, MIN, and MAX on your data. Example: SUM(Sales[Revenue]) adds up all revenue in the "Sales" table.
Filter Functions: Create calculations that filter data dynamically. Example: FILTER(Sales, Sales[Category] = "Electronics") isolates sales for electronics.
Time Intelligence Functions: Analyze data across different time periods. Example: TOTALYTD(Sales[Revenue], Dates[Date]) calculates year-to-date revenue.
Logical Functions: Perform conditional checks and comparisons. Example: IF(Sales[Revenue] > 10000, "High", "Low") categorizes revenue.
Text Functions: Manipulate and format text data. Example: CONCATENATE(Sales[Region], " - ", Sales[Category]) combines region and category names.
Mathematical Functions: Perform advanced mathematical calculations. Example: ROUND(Sales[Revenue], 2) rounds revenue to two decimal places.
Why Learn DAX?
Enhanced Insights: Allows you to perform in-depth data analysis. Custom Reports: Create highly customized and interactive dashboards. Data Modeling: Helps in building robust and efficient data models. Tips for Learning DAX Start with basic functions like SUM, AVERAGE, and COUNT.
Gradually explore advanced concepts like CALCULATE and RELATED.
Practice writing and testing functions in Power BI Desktop.
Refer to the DAX Function Reference regularly for detailed explanations.
DAX formulas Are Used In: -
Measures: Measures are dynamic calculations that adjust based on the context within your reports, such as filters and slicers. They are essential for aggregating data, like summing sales or calculating averages.
Calculated Tables: Calculated tables are created using DAX formulas and are particularly useful when you need a new table based on existing data. They allow for data modeling without requiring additional data imports.
Calculated Columns: Calculated columns add new data to existing tables by applying a DAX formula to each row. They are useful for creating new information from existing data.
Row-Level Security (RLS): RLS restricts data access for specified users, ensuring that individuals can only view data pertinent to their roles. DAX formulas define these security filters.
Conclusion:
Mastering DAX functions can take your data analysis skills to the next level, allowing you to extract actionable insights and build powerful dashboards. Begin your journey by experimenting with basic functions and gradually dive into more complex ones.
For more in-depth guidance and tutorials, visit our website Memetic Solutions!
#DAXFunctions#PowerBI#DataAnalysis#DataModeling#BusinessIntelligence#LearnDAX#PowerBIUsers#DataInsights#DataVisualization#Analytics
0 notes
Text
Mastering Excel: Understanding and Correcting Errors
Mastering Excel: Understanding and Correcting Errors Mastering Excel: Understanding and Correcting Errors Introduction Excel is a powerful tool for data analysis and manipulation, but it's not immune to errors. From simple typos to complex formula issues, encountering errors is inevitable. This article will guide you through common Excel errors, their causes, and effective strategies for correction. In this tutorial Common Excel Errors and Their Causes 1. #DIV/0! Cause: Attempting to divide a number by zero. Solution: Check for zero values in the denominator. Use the `IFERROR` function to display a custom message or zero instead of the error. Example: `=IFERROR(A1/B1, "Cannot divide by zero")` 2. #N/A Cause: Data is not available for the function or formula. Solution: Ensure the data source is accurate and complete. Use the `IFNA` function to handle missing data gracefully. Example: `=IFNA(VLOOKUP(A1,B:C,2),"Data not found")` 3. NAME? Cause: Excel does not recognize text in the formula, often due to typos in function names or cell references. Solution: Double-check the spelling of function names. Verify cell references are correct. Ensure you're using the correct syntax for the function. 4. #NULL! Cause: Using the intersection operator (space) between cell ranges that do not intersect. Solution: Adjust the cell ranges to ensure they overlap. Use the `UNION` function to combine non-intersecting ranges. 5. #NUM! Cause: A problem with a number used in a formula or function. The formula cannot find a solution. Solution: Check for invalid numbers or arguments. Adjust the formula or function parameters. 6. #REF! Cause: An invalid cell reference, often due to deleted cells or rows. Using a named range that no longer exists. Solution: Correct or update cell references. Redefine named ranges. Use absolute references ($A$1) to prevent errors when rows or columns are inserted or deleted. 7. #VALUE! Cause: Wrong type of argument or operand used in a formula or function. Text where a number is expected. Solution: Ensure the correct data type is used in the formula. Remove extra spaces or special characters. Check for hidden characters. General Strategies for Error Correction Read Error Messages Carefully: Excel provides helpful error messages. Pay attention to the specific error and the cell where it occurs. Use Error Checking Tools: Excel's built-in error checking tools can help identify and resolve common issues. Check Data Entry: Review all data for accuracy and consistency. Use the Evaluate Formula Tool: Step through the formula to see how Excel calculates it, identifying any errors in the process. Test Formulas with Simple Data: Test formulas with small, known values to isolate the problem. Use Error Handling Functions: Functions like `IFERROR`, `IFNA`, and `ISERROR` can help manage errors gracefully. Preventing Future Errors Plan Your Worksheet: Before entering data or creating formulas, plan the layout and structure of your worksheet. Document Your Work:Keep track of your formulas and data sources for easier troubleshooting. Use Absolute References: When appropriate, use absolute references to prevent errors when rows or columns are inserted or deleted. Regularly Check for Errors: Periodically review your work for any errors that may have crept in. By understanding the common types of Excel errors and employing these strategies, you can effectively troubleshoot and correct issues, ensuring the accuracy and reliability of your work. اكسل متقدم via عالم الاوفيس https://ift.tt/XL5URJt December 28, 2024 at 12:45AM
0 notes
Video
youtube
How to quickly Convert Text to Date in Excel using Text to Columns Hello everyone, Today I will present you, How to quickly Convert Text to Date in Excel using Text to Columns. If this video useful to you please give it a Thumbs-Up and Subscribe to this channel so that you will notified as soon as we release another tutorial. If you have any special tutorial requests, please post them below this video. Facebook Page: https://www.facebook.com/Eot89 Twitter: https://twitter.com/RehanaDhaka1216 Please, Subscribe to My Channel: https://www.youtube.com/channel/UC-pus296zbGdNpffiuaVDvg #Microsoft_Excel #Microsoft_Excel_tutorial #convert_number_to_date_excel #convert_text_to_date_in_excel #Convert_Text_to_Date_in_Excel_using_Text_to_Columns
0 notes
Text
Start Your SQL Journey Today: Beginner's Tutorial for Programming Newbies
Are you eager to dip your toes into the vast world of programming? If so, SQL (Structured Query Language) is an excellent place to start! Whether you're an aspiring data analyst, a business professional looking to enhance your skills, or simply curious about databases, SQL offers a straightforward entry point into the realm of programming. In this beginner's tutorial, we'll take you through the basics of SQL in a simple and easy-to-understand manner, so you can kickstart your SQL journey with confidence.
Understanding SQL: A Brief Introduction
SQL, often pronounced as "sequel," is a specialized programming language designed for managing and manipulating relational databases. Relational databases store data in tables consisting of rows and columns, and SQL allows users to perform various operations on these databases, such as querying, updating, inserting, and deleting data.
Setting Up Your Environment
Before diving into SQL, you'll need to set up your environment. Fortunately, getting started with SQL is hassle-free, as there are several user-friendly platforms and tools available for beginners. One popular option is SQLite, a lightweight, self-contained SQL database engine that requires minimal setup. You can download SQLite for free and install it on your computer to begin practicing SQL queries right away.
Learning the Basics: SQL Syntax
SQL syntax may seem intimidating at first glance, but fear not – it's much simpler than it appears. Let's break down some fundamental SQL commands to get you started:
SELECT Statement: The SELECT statement is used to retrieve data from a database. You can specify which columns you want to retrieve and apply conditions to filter the results. Example:
sql
Copy code
SELECT column1, column2 FROM table_name WHERE condition;
INSERT Statement: The INSERT statement is used to add new records to a table. Example:
sql
Copy code
INSERT INTO table_name (column1, column2) VALUES (value1, value2);
UPDATE Statement: The UPDATE statement is used to modify existing records in a table. Example:
sql
Copy code
UPDATE table_name SET column1 = value1 WHERE condition;
DELETE Statement: The DELETE statement is used to remove records from a table. Example:
sql
Copy code
DELETE FROM table_name WHERE condition;
Creating Your First Database
Now that you're familiar with some basic SQL commands, let's create your first database. Imagine you're building a simple address book application. We'll create a table named "contacts" to store contact information, including names, phone numbers, and email addresses.
Creating a Table: We'll use the CREATE TABLE statement to define the structure of our "contacts" table. Example:
vbnet
Copy code
CREATE TABLE contacts (
id INTEGER PRIMARY KEY,
name TEXT,
phone TEXT,
email TEXT
);
Inserting Data: Next, we'll use the INSERT INTO statement to add some sample data to our table. Example:
sql
Copy code
INSERT INTO contacts (name, phone, email) VALUES ('John Doe', '123-456-7890', '[email protected]');
INSERT INTO contacts (name, phone, email) VALUES ('Jane Smith', '987-654-3210', '[email protected]');
Retrieving Data with SELECT Statements
Now that we've created our database and populated it with some data, let's retrieve information from the "contacts" table using the SELECT statement.
Selecting All Columns: To retrieve all columns from the table, we can use the asterisk (*) wildcard. Example:
sql
Copy code
SELECT * FROM contacts;
Filtering Results: We can use the WHERE clause to filter the results based on specific conditions. Example:
sql
Copy code
SELECT * FROM contacts WHERE name = 'John Doe';
Updating and Deleting Data
In real-world scenarios, you may need to update or delete existing data in your database. Let's explore how to do this using SQL.
Updating Records: Suppose John Doe's phone number has changed. We can use the UPDATE statement to modify his phone number. Example:
sql
Copy code
UPDATE contacts SET phone = '555-123-4567' WHERE name = 'John Doe';
Deleting Records: If Jane Smith decides to remove her contact information from our address book, we can use the DELETE statement to delete her record. Example:
sql
Copy code
DELETE FROM contacts WHERE name = 'Jane Smith';
Conclusion: Your SQL Journey Begins Here
Congratulations! You've taken your first steps into the exciting world of SQL. In this beginner's tutorial, we covered the basics of SQL syntax, creating databases and tables, inserting and retrieving data, and updating and deleting records. Remember, practice makes perfect – continue experimenting with SQL queries and exploring its capabilities to further enhance your skills. With dedication and persistence, you'll soon become proficient in SQL and unlock endless opportunities in the field of data management and analysis. So, what are you waiting for? Start your SQL journey today and embark on an exciting adventure into the world of databases and programming!
0 notes
Text
Introduction to MS Excel: Essential Tips for Beginners

Are you a student or a professional looking to enhance your spreadsheet skills? Look no further than Microsoft Excel, a powerful tool that can simplify your data management and analysis tasks. In this Beginner's Excel Tutorial, we'll explore some basic Excel techniques that will set you on the path to becoming a proficient user.
Understanding the Excel Interface
Let's start with the basics. When you open Excel, you'll be greeted with a grid of cells arranged in rows and columns. Each intersection of a row and a column is called a cell, and it is where you can enter and manipulate your data. The ribbon at the top of the screen contains various tabs, each dedicated to a specific set of tools.
Entering Data
To input data into Excel, simply click on the desired cell and start typing. You can enter numbers, text, or a combination of both. Press Enter to move to the next cell below or use the arrow keys to navigate. If you make a mistake, don't worry! You can edit the content of a cell by double-clicking on it.
Basic Formulas
Excel's real power lies in its ability to perform calculations. Formulas are expressions that perform operations on the data in your spreadsheet. The most basic formula involves using arithmetic operators such as addition (+), subtraction (-), multiplication (*), and division (/). For instance, to add the contents of two cells, use the formula =A1+B1, assuming A1 and B1 are the cells you want to add.
Auto fill Feature
Save time and effort by utilizing Excel's Autofill feature. If you have a series of numbers or a pattern, enter the first few and then drag the small square at the bottom right corner of the selected cell to fill the rest automatically. This feature is handy for creating numbered lists, dates, or any sequential pattern.
Cell Formatting
Make your spreadsheet visually appealing and easy to read by formatting cells. You can change the font, font size, color, and even apply borders to cells. Excel also allows you to format numbers, dates, and currency to suit your preferences or the requirements of your data.
Sorting and Filtering
Efficiently organize your data by sorting and filtering. Highlight the range of cells you want to organize, go to the "Data" tab, and choose the desired sorting or filtering option. This is particularly useful when working with large datasets, allowing you to focus on specific information.
Charts and Graphs
Excel makes it simple to represent your data visually through charts and graphs. Highlight the data you want to visualize, go to the "Insert" tab, and choose the type of chart that best suits your data. Whether it's a pie chart, bar graph, or line chart, Excel has you covered.
Saving and Sharing
Once you've created your masterpiece, don't forget to save your work. Click on the floppy disk icon (or use the shortcut Ctrl + S) to save your spreadsheet. You can also share your Excel file with others by clicking on the "Share" option, allowing multiple users to collaborate on the same document.
Conclusion
This brief Beginner's Excel Tutorial covers the fundamental skills you need to get started with Microsoft Excel. As you become more comfortable with these basic techniques, you'll be ready to explore more advanced features and functionalities. Excel is a versatile tool that can be an asset in various fields, so embrace the learning process and watch your spreadsheet skills grow
0 notes
Text
Corporate Finance Institute – Advanced Excel Formulas and Functions LINK DOWNLOAD: https://skillscourse.net/corporate-finance-institute-advanced-excel-formulas-and-functions/?feed_id=1867&_unique_id=653f6b815f9c9 Corporate Finance Institute – Advanced Excel Formulas and Functions Description of Advanced Excel Formulas and Functions This advanced Excel course is designed to take Excel users to the next level by illustrating advanced functions and formulas. Understand how to reference data using INDEX and MATCH Manipulate text-string data using functions like RIGHT, CELL, LEN, and FIND Apply data analysis tools, like data tables and PivotTables Master charting features like creating a gauge chart Learn the most advanced formulas, functions, and types of financial analysis to be an Excel power user. This advanced Excel training course builds on our free Excel Fundamentals – Formulas for Finance. It is designed specifically for spreadsheet users who are already proficient and looking to take their skills to an advanced level. This advanced tutorial will help you become a world-class financial analyst for careers in investment banking, private equity, corporate development, equity research, and FP&A. By watching the instructor build all the formulas and functions right on your screen, you can easily pause, rewatch, and repeat exercises until you’ve mastered them. What You’ll Learn In Advanced Excel Formulas and Functions This advanced Excel training course starts with a blank spreadsheet and quickly dives into using combinations of functions and formulas to perform dynamic analysis. The main formulas & functions covered in this training course include: INDEX and MATCH IF with AND / OR OFFSET combined with other functions CHOOSE for creating scenarios INDIRECT combined with other functions XNPV and XIRR CELL, COUNTA, and MID functions combined together PMT, IPMT, and principal payment calculations The main types of data analysis in this advanced tutorial include: Data tables Pivot tables Column and line charts Stacked column charts Waterfall charts Gauge charts More courses from the same author: Corporate Finance Institute
0 notes
Text
Python read csv
A csv stands for "comma separated values", which is defined as a simple file format that uses specific structuring to arrange tabular data. It stores tabular data such as spreadsheet or database in plain text and has a common format for data interchange. A csv file opens into the excel sheet, and the rows and columns data define the standard format.
0 notes
Text
Mastering Microsoft Excel - Tips For Advanced Users
Whether you're a professional Excel user or just using it to keep track of your own finances, Microsoft's industry-leading spreadsheet software has a wealth of features that can save time and improve accuracy. Mastering these advanced techniques will help you to impress coworkers and clients, as well as keep your workflow running smoothly. From learning how to quickly format and move data to creating a drop down list, these tips are sure to make you the envy of your colleagues at your next work meeting.
Adding and subtracting numbers is fairly straightforward, but multiplying and dividing aren't as simple. When you're working with large numbers, it's easy to miss a decimal point or miscalculate. Fortunately, there are a few simple tricks to remember to avoid making these mistakes. For example, if you want to multiply two numbers together, simply enter the first number followed by a comma and then the second number. This will automatically calculate the answer for you. To divide two numbers, use a forward slash (/) instead of a multiplication sign.

Another useful tip is to format cells so that they display the information in a way you prefer. You can change the formatting of a cell by right-clicking on it and selecting "Format Cells." This will open a module where you can choose from a variety of options, including one that allows you to transpose columns into rows and vice versa. You can also select a cell and click "Paste Special" to paste the contents of that cell as text, which will convert any numbers into letters.
If you want to learn more advanced tricks, it's worth taking a course in Excel online from https://techogle.co/ a reputable provider. These courses offer comprehensive, flexible training that will allow you to study from home or at work and will give you a solid foundation in the program's functionality. These courses can range from a short, bite-sized video tutorial to an entire degree program.
You can also use keyboard shortcut keys to speed up your workflow. Some of these include Ctrl+C to copy, Ctrl+V to paste and Ctrl+Z to undo. In addition, you can use the shortcut key Ctrl+PgUp to switch between worksheet tabs and Ctrl+A to select all of the cells on a sheet.
Another great feature of Excel is that it can recognize a variety of different formulas and functions, allowing you to do calculations and analysis that would be difficult or impossible to do manually. Start by learning the basic formulas like SUM, AVERAGE and COUNT and then expand your knowledge to more advanced functions.
Finally, you can also save time by using the fill handle to select a group of cells. When you have a group of numbers that you want to drag, just hold down the mouse button and then drag downwards. The cells will follow the sequence of values or formulas you're dragging, saving you time when you're moving or formatting data. To get started, select the first value in the row and then click the small square at the bottom right corner of the cell selection border.
1 note
·
View note
Text
Excel: An Introduction and Tutorial.
Excel from Microsoft is a robust spreadsheet programme that has proven useful for both personal and professional use. Learn the fundamentals of Excel whether you're a student, a working professional, or just someone interested in improving your data management abilities. To get you started on the road to spreadsheet mastery, this article will cover Excel's essential principles and functionalities.
Getting Acquainted with Excel's User Interface
When you launch Excel, you'll see a grid of rows and columns that you may use to create cells. A unique reference, such as "A1," is assigned to each cell, where the letter stands for the column and the number stands for the row. The Ribbon is located at the top of the screen, and each of its tabs provides access to a different set of functions and tools for manipulating your data.Excel Vlookup is actually very good.
Data Input
You may start typing into a cell after clicking on it in Excel. Enter any combination of words, digits, and/or dates. Press the "Enter" key to advance to the next empty cell.Xlookup has been excellent. To make changes to the contents of a cell, double-click on it, then type in your new data and hit "Enter" again.
Cell Layout Modifications
Excel's numerous formatting tools allow you to give your numbers a polished, well-organized look. Excel Match Function will always help you. Change the font, colour, border, and orientation of your text, numbers, and dates. Choose "Format Cells" from the context menu that appears when you right-click a cell.
4.Fundamental arithmetic procedures
Excel is capable of performing arithmetic functions such as adding, subtracting, multiplying, and dividing. Add "+", subtract "-", multiply "*", and divide "/" to perform basic mathematical operations. You can find Excel If Function easily.
Purposes
You can execute sophisticated calculations and analyses with the help of Excel's many in-built features. Standard operations consist of SUM, AVERAGE, MAX, MIN, COUNT, and IF. Hlookup is also the best. To call a function, enter "=" followed by the name of the function and any arguments it takes. As you type, Excel will offer recommendations to help you along.
Function
AutoFill is a time-saving and labor-reducing function in Microsoft Excel. Countifs Function In Excel is used widely. You may fill in neighbouring cells with a pattern or series by entering data (such as numbers, dates, or text) in a column or row, selecting the cells, and dragging the fill handle.
Refinement by Category
You can sort and filter your data to get it in order for analysis. Sumifs Function In Excel has the finest results. Select the data you want to sort and then use the "Sort A to Z" or "Sort Z to A" button on the Ribbon to arrange the columns alphabetically or numerically, respectively. You may select certain statistics to display depending on certain criteria by clicking the "Filter" button. You can find Index Match Multiple Criteria.
Graphs and Diagrams
Excel's chart and graph features make it easy to see patterns and trends in your data. To create a graph or chart from your selected data, click the "Insert" tab and pick the appropriate option from the drop-down menu. Subtotal Function in Excel is indeed outstanding. Excel's charting tools include both bar and line graphs, as well as pie charts.
0 notes
Text
Computer Course (Microsoft Excel)
Computer Courses near me, Microsoft Excel is a powerful spreadsheet application developed by Microsoft, commonly used for various data-related tasks in businesses, education, and personal finance. It was first released in 1985 and has since become an integral part of the Microsoft Office suite.
Excel offers a grid-based interface consisting of rows and columns, where users can enter and manipulate data. Here are some key features and functionalities:
Data Entry and Calculation: Users can input numbers, text, and formulas into cells. Excel's built-in functions enable mathematical, statistical, and financial calculations.
Charts and Graphs: Excel allows users to create various types of charts and graphs, making it easier to visualize data trends and patterns.
Data Analysis: With features like PivotTables and PivotCharts, users can summarize and analyze large datasets quickly.
Conditional Formatting: Users can apply rules to format cells based on specific conditions, making it easy to highlight important information.
Data Validation: Excel provides tools to set data validation rules, ensuring that data entered into cells meets predefined criteria.
Database Management: It can function as a simple database, with the ability to sort, filter, and organize data efficiently.
Automation: Users can automate tasks using macros and Visual Basic for Applications (VBA), which allows for custom scripting.
Collaboration: Excel supports real-time collaboration, allowing multiple users to work on a spreadsheet simultaneously through Microsoft 365 online services.
Data Import and Export: It can import data from various sources, including text files, databases, and the web, and export data to different file formats.
Data Security: Excel offers features for password protection and encryption to secure sensitive information.
Add-Ins: Users can enhance Excel's functionality by adding custom add-ins and extensions.
Computer Course Excel's versatility makes it a valuable tool in industries like finance, accounting, marketing, and more. Its widespread use has led to a vast ecosystem of online tutorials, templates, and forums, making it accessible to users of all skill levels. Whether for creating budgets, analyzing data, or tracking project progress, Excel remains a staple in the world of data management and analysis.
0 notes
Text
...I know like five posts you're looking for, and I apparently did not save any of them, so I'm going to give you a bunch of links and then you're going to ask me questions and then I will answer them. Because honestly, I'd love to write up a guide but I'm unsure where to start. You know the "of course the average person only knows the formulae for quartz and some feldspars" comic? Yeah, tragically that's me, so I'm gonna hand you some links and write some real quick guides and go from there.
Here is a Computer Hardware Care 101 post, with additions by yours truly.
Here's some webmastery links, which isn't quite what you're looking for but is also the first link I had on hand. The second link I grabbed while I was searching was the how-to-unfuck-Windows-11, which I figure you guys might be running. As a slightly easier version, here is how to disable web search where it shouldn't be.
A very big masterpost of internet resources; and a beginner's guide to the indie web. Another masterpost of things to do on the internet. And a digital piracy guide, for funsies.
Quite a few of these guides will say "but seriously, switch to Linux" and while that's an option, if you're struggling to understand directories and folder trees (no judgment if you've never seen them before, unfortunately everything to me should be a folder tree) then it might not be a good option until you know what you're doing. However, if you're bold and want to try it anyway, here's a guide.
Now, under the cut, I'm gonna give you some really quick and dirty tutorials that are really more pointing you in a direction and giving you a thumbs-up about it. If you can't figure it out, that's fine, I can answer any and all questions you have. (I graduate in two months with a bachelor's in IT, it's unlikely you'll throw me.)
Excel / Gsheets / Very Basic Databases
As far as excel goes, use google sheets, it's just faster, and then making the jump to excel is easier. Your task: make a spreadsheet that tracks something and then tallies them up and hands them back to you in a nice counted format. For this example, let's track genre of books we've read.
Make a new gsheet. Leave the top ten rows mostly blank for now, but put in a real quick list of book genres in one column. Then colour row 11 in another colour as a visual divider. Under it, place a bunch of book titles in column A, the corresponding author in column B. Now right click row 12 column C, which should be next to the author's name of the first book. Select data validation, add a rule, and then select dropdown from a range.
Then click the little square button. Go back up to your list of genres, left click the top one, then hold down shift and left click the last genre. It should have selected the whole list. (Holding down shift selects everything between the first and second click. Holding down control will instead just select the second one without unselecting the first, so you can pick and choose. Do experiment with this until you get the hang of it.)
Hit ok until you're out of there, and that cell should now be a dropdown of genres. Sick. Now on the bottom-right of your selected cell should be a little square a big bigger than the rest of your cursor. Left click, hold down left click, and drag straight down to the last book. Release left click, and they should all now have that dropdown.
Go through manually and give each book a genre from the dropdown. Then go back up to your first genre, and in the column immediately beside it, place in a COUNTIF function. Your range should be column C, from row 11 to row whatever the last book is. So C11:C[number here]. Your criterion should be either "Genre" with quotations (this identifies it as a string, aka it's text), or just place in the cell number of the genre. So if the genre is Fantasy in cell D4 (and you're in cell E4), place just D4.
This should return a counted value of how many books are fantasy books. Rinse and repeat for the other genres. You should get a total of all of them. Your next task is to use the UNIQUE function to get a list of all your authors, and then to use COUNTIF to get author totals.
Once you've gotten that far, you can do whatever you want, you probably can read the documentation well enough to do whatever. I recommend learning VLOOKUP, CONCATENATE, and SUMIF. Spreadsheets are great for crunching numbers and keeping track of stuff, I recommend them.
File Trees / Directories
I'll be honest, I really don't know where to start because I don't know what you know and don't know. So if I am missing information, please tell me and I will explain. This is very natural to me, if I skip over stuff I can go back.
But it works like this. Every file on your computer has a location and it is almost always going to look pretty similar to this: "C:\Users\RaymondShields\Pictures\rickroll.png"
Note the backward slash, \, as opposed to the forward slash, /. We do not use forward slashes locally (on your computer, not on the web), but we do use them on the web, where they fulfil the same purpose.
I must heavily stress one thing: file explorer is not the internet. It should only show you things on your computer, not on the web. I hear windows 11 fucks with that, but I won't touch it with a ten foot pole so idk. This focuses on file explorer.
So let's break that url down real quick. C:\ is "C drive". It is very likely where your OS (operating system) is stored. (A and B drives are reserved for floppies and generally no longer used. Fun fact.) If your computer has multiple hard drives, they are likely to be D:\ (generally CD/DVD) and E:\ and continuing on from there.
(If you want to look at your drives, just go into file explorer and click This Computer / My PC. It will display them. If you right click and go into properties, you can see more info.)
After C:\ is a bunch of folders we generally don't care about unless we need to. Program Files and Program Files (x86) are generally interchangeable, but that is where most of your programs (the desktop version of mobile apps) are stored, alongside many many configuration files. (They are sometimes stored as .dat or .bat files. When in doubt, just google '.dat file format' or whatever format to learn what they are.)
Right now, we care about the Users folder. It should have default, public, and all local user accounts. One of those folders is your local account, for this example it's RaymondShields. (To check your local account, hit that start menu and bottom left should be a few icons, including power and settings, and the top should be an avatar. That is you.)
Go into there and there's a bunch more folders, whee. Some of them have fancy icons, those are Official Microsoft Directories. Some of them start with a dot and are program-installed. One of them is hidden and called AppData (and you can get there fast by typing %appdata% into the file explorer address bar), and you only care about that one when you're installing minecraft mods.
Now. Official Microsoft Directories are two things at once and that makes them fun. They are first and foremost Regular Folders like every other folder so far. (If you create folders in your pictures or documents directories, exact same thing.) They are also shortcuts.
Which is to say, when your computer says "get me Pictures\rickroll.png", it knows to translate that 'Pictures' into "C:\Users\RaymondShields\Pictures\". However, because 'Pictures' is just a shortcut, you can also just change where the shortcut 'Pictures' points to. If you decide you want your pictures on your D:\ drive instead, create a folder on D:\ named Pictures, then go to the Pictures directory, right click properties, and change its location. It'll ask you if it can copy files over, and from then on, when you select 'Pictures' in the file explorer sidebar, it will lead you to 'D:\Pictures\' instead.
This is a very important point: there is a difference between a relative file path and an absolute file path. Think of it like this: a relative path is saying "uh, the gas station on First Ave and 6th St?" and an absolute path is "the Shell at 12345 First St Vancouver BC Canada V4G 1N4". (Actual Canadian postal code, fun fact.)
Which means when you're in the command prompt, which you'll end up doing quite a bit for any finicky stuff, the difference between "pictures\folder\folder2\rickroll.png" and "\pictures\folder\folder2\rickroll.png" is massive.
The first one, without that first slash, is the relative path. It will look for a folder named "pictures" in the folder you are currently viewing. So if you're viewing the RaymondShields folder, it will start there and look for Pictures there. The second one, with the slash, is the absolute path. It will go all the way up to the root folder, which is generally going to be C:\ or D:\ or whatever. Where you can't go up a folder anymore. And then it will look there for Pictures.
This is good because no one wants to hardcode file paths every time. (Hardcode: using the absolute file path. Sometimes you have to, but if you say, renamed folder2, every absolute file path that needs something in a subfolder (folder within) of folder2 is going to break.) It is also bad if you're new and still getting the hang of when to use the absolute path and keep mixing it up.
You may also notice at some point that I mentioned AppData, a hidden folder inside RaymondShields. If you did not see it, go up top to the file / home / share / view bar, select view, and then view hidden folders. Now it should be visible.
Hidden folders generally mean "don't touch me" but all a hidden folder really means is that it isn't visible without that option turned on. I keep the setting on because I want to see stuff, but it doesn't prevent access or anything. However, if a file is hidden and it's a .bat or some other system config file, don't touch it unless you know exactly why you're doing it. It might break a program, it might crash your OS. Be careful, is what I'm saying.
But that's how a file tree works. You can keep going down folders for as long as you have folders to go down, and then you just go right back up the tree and down a different branch. (Think of it like a family tree, to visualize, but like, upside down. You start at one root and go down, and in a family tree, you are the root directory, and your parents are subfolders of you, and so on and so forth.)
Every single file on your computer, every single bit of data, is somewhere in the file tree. It has an absolute path, it has a file type, it is stored somewhere on your drives. Half the battle is finding it.
When you're in the command line, you go up and down and sometimes jump across the file tree using the "cd" command, and it's "cd .." to go up one level to the parent folder. You will do this a lot, and it'll be shorthand really fast.
Your phone also has a file tree. As does every other computer, in whatever form they take, on the planet. If you have an Android, plug it in, select the device under the 'This PC' directory in the sidebar, open that sucker up, and go wandering through the file tree. If you have an iphone, your file tree is hidden from you without specialized software, because Apple sucks.
Get really familiar with just googling shit. ".bat file format" and "appdata folder" and "gsheets get all unique values from range" and "motherboard specs command prompt". Right click your task bar at the bottom of your screen and open task manager, click around and figure out what stuff is by googling.
In desktop machines, you do a lot of click around and "huh what's that" and opening menus just to open menus. If you know you're in the right area of a program's menus, do as you would looking for your mother's chocolate stash and just start opening folders and drawers and menus and under the bed until you find what you're looking for. Don't be afraid to click stuff and do actions! Control+Z (hold control, press Z) is the shortcut for undoing things, and Control+Y redoes them if you just undid them.
Windows will prompt you if whatever you're about to do is permanent and cannot be ctrl+Z'd. Don't worry about it. You can just do whatever you want.
(Last tip, to learn to touch type, don't bother with any of those tutorials. F and J on keyboards generally have little ridges that you can feel, put your index fingers there, and then copy a note from a paper to Microsoft Word. Put the paper next to your monitor and just transcribe as fast as you can. You will eventually just memorize where the keys are, and if you start fucking up, feel for F and J and put your hands back in the right place and then keep going. It's fine.)
So hope that helps a bit?? I spent like an hour writing this and if you have any questions PLEASE TELL ME I WILL WALK YOU THROUGH IT. But I think it's an okay start!!
also re lrb does anyone have that one post that was going around a while back abt a site of like. computer skillz by gen z for gen z. i wanna look at it
9 notes
·
View notes
Video
youtube
Excel Tutorial: Text to Columns
#excel tutorial#excel tip#excel training#excel tutorial text to columns#excel text to columns#excel data#convert data in excel
0 notes
Text
How I Manage my Mods for Big Patch Updates!
Big updates can be overwhelming when you have a lot of mods, so I thought I would make a guide about how I keep track of things with google sheets!
As always, remember to back up your saves and take your mods folder out before you update! (taking the folder out is not necessary, but a good safeguard). Playing with unconfirmed and not updated mods after an update is at your own risk! If you want to wait until your mods are updated, turn off automatic updates and play in offline mode.
Even if you don't want to do a google sheet, it's still good to know where you can find your mod updates!

Resource List:
Deaderpool Discord Server (public server)
Google Sheets (you can use any excel-based program but this is what I use and it's free) I'll be giving some tips but this is not a google sheets tutorial.
Scarlet/Sims VIP Broken/Updated Mod List (edit: Scarlet changed it so the list is not on google sheets but displayed on her site. It's the same link and you can still search with ctrl + f so nothing has changed in this tutorial. I use the filtered views list).
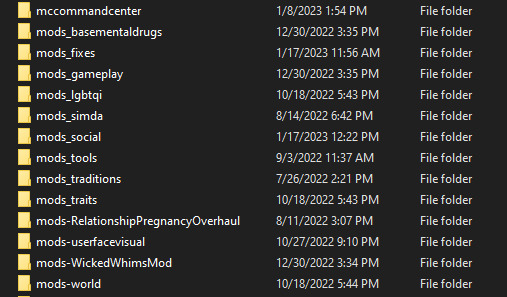
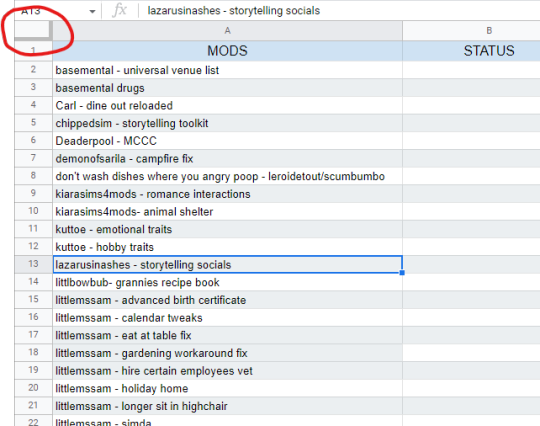
First off: I will always recommend sorting your mods into folders. At the very least, a separate folder for your mods away from your cc. Remember that script mods should only be at most, one folder deep. This is how I personally organize my mods. Note that they all start with "mods" so they all appear together alphabetically. I group big mods on their own and smaller mods into these categories.
2. The first thing to do is to create a template sheet. This will be a list of your mods formatted in sheets that you can duplicate when an update happens. If you have any new mods, add them here and not to your update sheets. I do not include every single mod. The mods I include are my script mods and large tuning mods that are updated by their creators. Some mods, like for example the no blu by luumia, are small enough to not worry about and do not receive compatibility confirmations so I leave them out.
3. This is how my template is formatted:

When an update happens, I will cross reference my sheet to the Scarlet's List and input whether it is broken, compatible or updated. Once a broken mod is updated, I will change the status accordingly.
The creator's name comes first so that way if you decide to sort the sheet A to Z they will be grouped by creator. (You'll see why later). Do this by left clicking on column A. If you sort by A to Z the column titles will be sorted too, so freeze that row.
Edit: I also recently added a column for the links to the mod pages! I suggest wrapping the text in that column to keep it neat.
4. The Scarlet/Sims VIP Broken/Updated Mod list is updated in real time by tons of contributors and modders. Additionally, you can look for updates regularly with Scarlet's weekly update and changes list (found through the same link above) or with the mod news channel in Deaderpool's Server, which also gives updates. For now we'll only be looking at the main patch list.
There's tons of mods on here, but don't be alarmed! You can simply search the mod list with Ctrl + F. I recommend searching by creator so there is no confusion on the mods' names.
When an update happens, I will go down the list on my new, duplicated sheet and search for the creators on the Scarlet's List. I then label it on my sheet whether it is listed as broken, compatible or updated. Once a broken mod is updated, I will change its status to "updated".
Mods are listed as "unknown" if their status hasn't been confirmed any which way. After some time, I'd say a small "unknown" mod is safe to go ahead with, but do that at your own risk. I mainly am looking out for the big script mods, many small tuning mods I am willing to give the go ahead if it is still unknown after my major mods are confirmed.
I recommend sitting down and reviewing your mods after a day or so has past after the patch, or you can keep up and regularly update it with Deaderpool's server. You can also use google sheets on your phone for convenience.
Optional:
I do some conditional formatting as well to keep things more clear on my mods sheet. This is optional, but I do recommend it! Do this all on your template sheet so you do not have to redo it later on.
First, I go to Format>Alternating colors to make the rows clear from one another.
Go to Format>Conditional Formatting and select "add another rule".
Click on the top left square as shown here to select the entire sheet. The data range popup will appear. The data range should be something like 1:1000 (or whatever number of rows you have). Click ok.
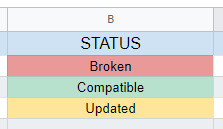
Choose "is equal to" for your format rules. Type in the one of the status names into "Value or Formula", I'm using "compatible". Select the color you wish the cell to highlight with. You can choose additional formatting styles as well.
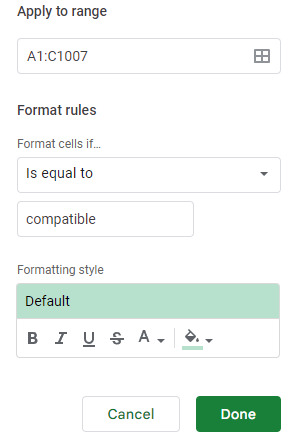
Repeat for "updated" and "broken" using different colors for all. I use red for broken, green for compatible, and yellow for updated. I leave mods that are "unknown" blank. Now when you type one of the status names into its column, the cell will highlight the respective color!
#ts4#the sims 4#ts4 tutorial#tutorial#sims 4#do it and know peace#and stop putting your mods with your custom content for the love of god
332 notes
·
View notes
Note
hey, I found a really amazing fanfic series I want to turn into a real book. Could you reshare the post about how you made the Blue Walls book?
I don't think I ever ended up making a How To post actually although I did promise! Ok give me a minute.
What you need:
A lot of a-4 plain printer paper
A LOT of white glue. More than you think.
Awl, thick needles, sewing cord coated in wax (I would recommend buying a cheap bookbinding kit, or at least bookbinding thread).
Cover fabric, I tend to buy a fat quarter and that's more than enough, try to get stuff that takes glue well.
Cardboard, not the stuff you get in boxes, that thinner sturdy stuff you can buy in packs.
Some fairly study other fabric, long, takes glue well, will be invisible by the end of the book so it doesn't matter what it looks like.
Creasing tool
METAL ruler (otherwise your knife will keep gouging it)
A sharp craft knife, sharp enough to cut good cardboard.
Lining paper, decorated and thick.
So you have to start by splitting the text up into signatures, which are like pamphlets, often made out of 8 A-4 sheets folded together so you get 32 pages out of it. You just stack them one on top of the other and fold in half. However because you're using text, you need to find out how much text of the story fits into 32 pages and then arrange it so when you fold it it folds over together. I tend to put all the text into one word document, format it the way I want (landscape, each sheet divided into two, and make sure the middle column margin is quite wide because the fold over takes up a lot of space. Also make side and top margins quite small otherwise it looks ugly). Then copy paste the 32 pages (which is 16 sheets in the document because you'll have to print double sided) into a new document, and then work with those 32 pages and rearrange them in a third document to be in the right order for double-sided printing where they all fit together to make a pamphlet. Arranging each page in the right section can be confusing and I can't really explain how it works, but it's a bit logical. Basically the first page on the first sheet should be the very last page of the 32, then the 2nd page on the first sheet should be the very first page, the first page of the second sheet should be the second page of the 32, and the second page of the second sheet should be the second to last page of the 32, and then it keeps going back and forth until it meets in the middle.
Your very front and back pages will be covered over with lining paper, so remember to leave empty spaces for them, and often you'll need to leave empty pages for aesthetic reasons, like if you want the title on the right of the spread rather than the left, for example. This is the most time consuming and frustrating part of the process, but it pays to take time and get it right.
I don't have any photos of signatures, but in a reblog I will link the webpages which I found really helpful in making this, and they have clear photos.
So you print out the signatures, you check to make sure all the pages fit together linearly, and then you crease down the middle. I would recommend buying a cheap bookbinding kit, it should have a tool for creasing, typically made with bone but now often just plastic. Creasing the inside means the pages don't crumple when you fold them over.
Then, you need to bind the signatures together. You need to sew them using thick thread with wax on it, and they're thick enough that you need to pierce them with an awl. Make five holes down the centre crease, one in the middle, then I tend to do two more one on either side an inch or an inch and a half from that first one, and then two more again, an inch or inch and a half from those.
You then sew, basically you sew along the signatures and then up to the next and then along again. I have an excellent tutorial with pictures that I will link, look at that for sure. It recommends using bookbinding tape, which gives more support to the pile of signatures, I don't use it but my books haven't been hugely thick, it's up to you. Pull the thread fairly tightly, if you don't the signatures will slide apart from each other and won't remain in line, but not so tight it wrinkles the paper.
Then, you need some thin cloth, easy to cut, takes glue easily, but sturdy. You need a length of it as long as the signatures and several times wider. None of it will be seen in the end so it doesn't matter what it looks like. What you do is you clip together the signatures tightly now they're sewn together, using bulldog clips, and cover the spines of them in white glue. White glue was invented for bookbinding originally, and you can get really fancy stuff, but tbh PVA works just as well. You need a LOT of glue, try not to let it seep between the signatures, but be liberal with it. Press the spine of the signatures directly onto the fabric, and leave the glue to dry with the signatures standing upright, I use cans of beans or whatever pressed on either side to keep it standing up.
While that's drying, make the cover. Measure the signatures beforehand, and cut out two identical rectangles of cardboard which are about a cm wider than the signatures, and between 1-2 cm taller. These will be the amount which sticks out from the pages of the book, so it depends on how much you want, but don't go too big. Also cut out a strip of cardboard exactly as tall as these rectangles, and as wide as the block of signatures is (I would suggest measuring the width of the signature block before gluing it). Then, cut out a rectangle of the cover fabric you want, it can be messily cut it doesn't matter, larger than the three pieces of cardboard arranged together in a row, and glue the cardboard to the backside of the fabric, in this arrangement:

Suddenly it starts to look like a real cover! I would recommend having a few cm of extra fabric on both sides. Use the same white glue as you did for the signatures. Leave to dry.
After everything is dry (and basically every time I say leave to dry, it should take about 12 hours maybe to be sure, there's a Lot of glue and it takes a LONG TIME). After everything is dry, you take the hanging over fabric of the cover and you fold it over and in, gluing it down to the inside of the cardboard. You can just glue as is, you can do fancy corners by pinching the fabric together at the corners and flattening that loose fabric into triangles, it's up to you. Be inventive. But make sure it's well glued down. It should go from this
To this

That's your cover!
Then, when everything is dry, you take the signature block and fabric glued to it. You trim the fabric if there's any sticking off top or bottom, and maybe cut that fabric on both sides diagonally from the top and bottom inwards, so it looks like a diamond if that makes any sense.

Unhelpful photo but see how that fabric, the cream stuff attached to the white, is kind of cut diagonally? Do that more.
Then, you glue the fabric, NOT THE SPINE, but the fabric on both sides of the spine of the signatures, to the cardboard rectangles that are the cover of the book. This is very important, you do not glue the spine of the signatures to anything, and the cardboard spine in the middle of the cover, that thin strip, is also not glued to anything. You need free movement there to be able to open the book to different pages without it being too stiff. It should end up looking like this when you close it.

No glue between the signatures and the spine of the cover.
So you leave this to dry again the signatures standing up, again the canned food is extremely helpful and beloved.
You're almost done! Get your lining paper. I got some real marbled paper from Yorkshire, very thick and heavy and pretty

But any patterned paper will do as long as it's not too thin. You can just print a design onto printer paper, that works fine.
This bit is tricky, you need to measure a rectangle on the lining paper that is exactly as high as the signatures, and as long as from the outer edge of the first page of the signature to maybe half a cm from the outer edge of the front cover. It should cover up all the edges of the fabric glued inside, but not reach all the way to the end of the cover. Do the same with the back page and back cover.
Then, you glue this paper directly onto the front cover and the front page, and the second piece directly onto the back cover and the last page. I tend to use too much glue for this so it comes out lumpy and wrinkled, so maybe use less and make sure it's positioned well. If too much sticks out from the front or back page, you can trim it a bit. Leave to dry.
That's it!!!! That's your book!! Completely made!!!!!! It's so cool!!!! In the reblog I'll put those links as I said, but really if I could figure it out you'll absolutely be able to. Good luck, show me pictures when you make it!!!
83 notes
·
View notes